
In this tutorial, you’ll learn how to implement Python’s depth-first search (or DFS) algorithm. The DFS algorithm is an important and foundational graph traversal algorithm with many important applications, finding connected components, topological sorting, and solving puzzles like mazes or Sudoku
By the end of this tutorial, you’ll have learned the following:
- What the depth-first search algorithm is and how to implement it using pseudo-code
- How to implement depth-first search in Python from scratch
- How to implement the depth-first search algorithm in Python using the NetworkX library
Want to learn about the breadth-first search algorithm instead? I have a full tutorial on the breadth-first search algorithm (BFS) in Python here.
Table of Contents
Understanding the Depth-First Search Algorithm
The Depth-First Search algorithm is a foundational algorithm for traversing a graph. As the name implies, it prioritizes depth over breadth.
Depth-First Search (DFS) is used in graph theory and algorithms to traverse or search through a graph or tree structure, systematically exploring each branch as deeply as possible before backtracking.
Let’s take a look at an example. Imagine we have the following graph and we want to traverse all nodes, starting at node 'A'.
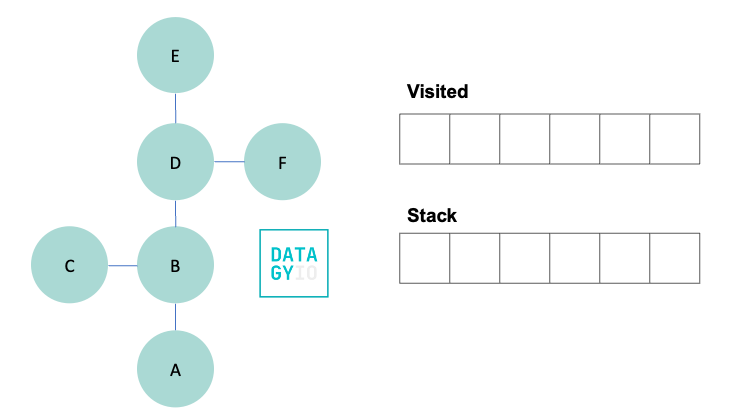
To do this, we create two objects:
- A stack, to keep track of items being added, in a last-in-first-out method, and
- A set, to keep track of nodes that we have already visited
To kick things off, let’s start by marking our starting node as visited, by adding it to our visited set. We then search for all of its neighbors and add them to our stack.
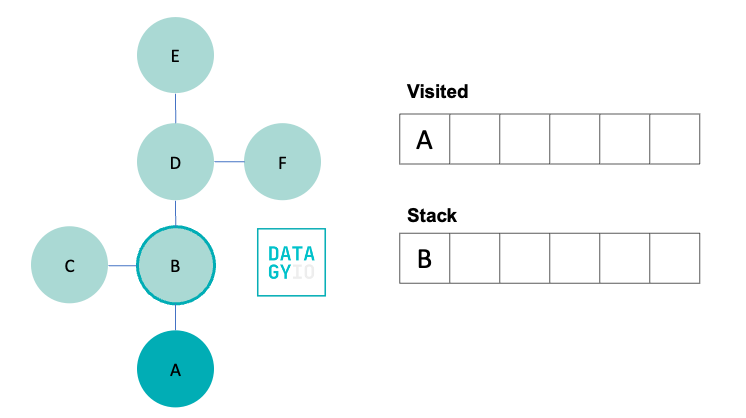
In the image above, we moved our visited node to our set of visited nodes. This allows us to ensure that we don’t accidentally visit it again. We also added the only neighbor 'B' to our stack. In the image, it’s highlighted with a darker circle, indicating that we know we will visit it shortly.
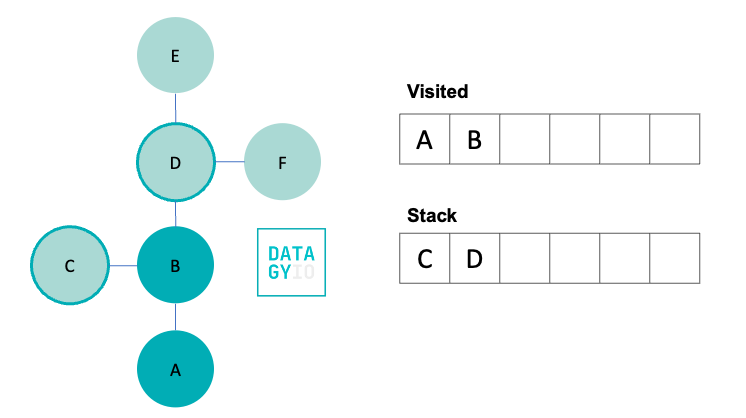
In our next step, we move to B. In doing so, we remove it from our stack and add it to our visited set. We then check for all of its neighbors, which in this case are 'C' and 'D' and add them to our stack.
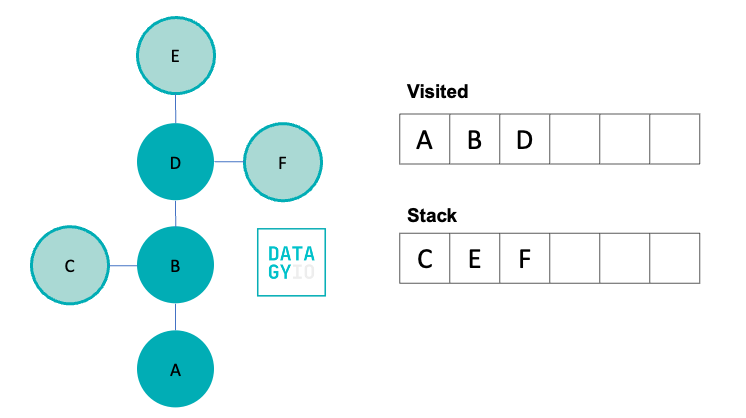
Following this, we then take the right-most item in our stack and visit it. We add it to our visited set and discover all of its neighbors. Because 'B' was already visited, we don’t add it to our queue. Instead we add only 'E' and 'F'.
We then, again, take the right-most item from our stack and visit it. We search for all of its neighbors and add them to our stack. Because the node has no neighbors, we then move onto the next item in our stack.
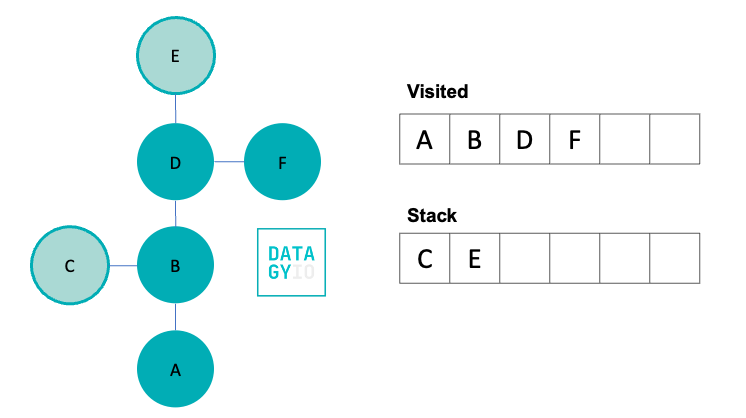
We then visit 'E', our right-most item in the queue. Because 'E' doesn’t have any neighbors we haven’t yet visited, we don’t add anything to the stack.
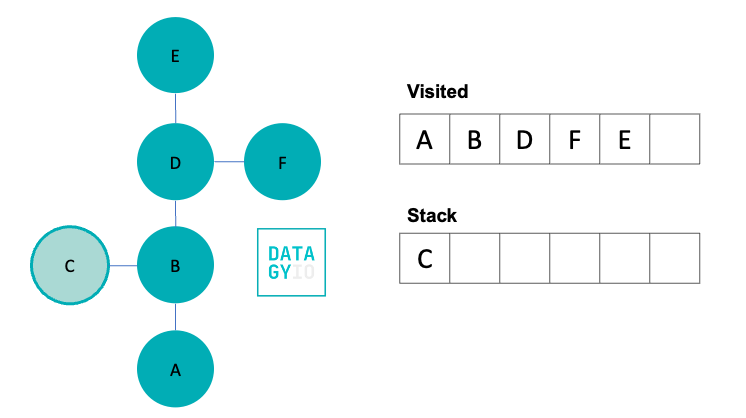
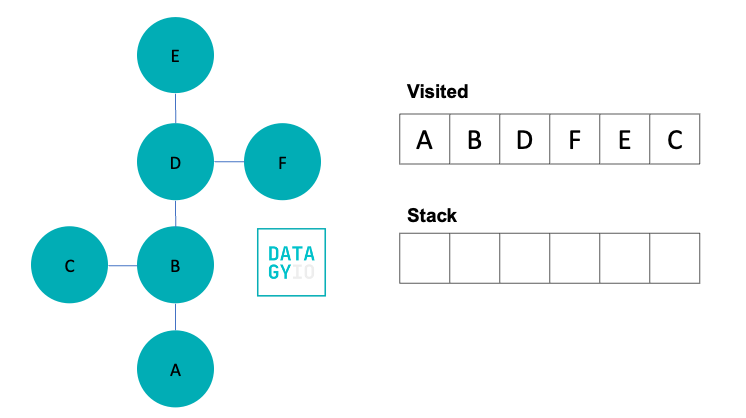
In our final step, we visit 'C'. Because 'F' doesn’t have any neighbors we haven’t yet seen, our depth-first search comes to an end here. However, we can see that while 'C' was a neighbor earlier in the process, we didn’t visit it until much later.
Now that you have seen how depth-first search (DFS) works in theory, let’s develop some pseudo code to better understand how we can implement this algorithm in Python.
Pseudo-Code for Depth-First Search
Writing some pseudo-code for the depth-first search algorithm will give us a strong foundation to use to implement it in Python. Let’s take a look at what this pseudo-code looks like:
stack = create an empty stack
mark startNode as visited and push it onto the stack

while stack is not empty:
    currentNode = pop the top node from the stack
    mark currentNode as visited

    for each neighbor in currentNode's neighbors:
        if neighbor is not visited:
            mark neighbor as visited
            push neighbor onto the stack
Let’s break down what our pseudo-code is doing:
- We create a stack to hold our data. In Python, this can be a simple list.
- We mark our starting node as visited and push it onto the stack.
- We then create a while loop that iterates while our stack is not empty. The while loop takes the top item from the list and marks it as the current node.
- We then mark the current node as visited and look at each neighbor and add them to our stack.
- If the neighbor isn’t visited, we mark it as visited and add it to the stack.
Now that we know what we need to do, let’s dive into how we would implement this in Python!
Implementing Depth-First Search in Python From Scratch
The depth-first search algorithm can seem a little daunting to implement in Python. However, it can be implemented easily and eloquently. Let’s break it down step-by-step and see how to do this.
We’ll start by implementing our graph as an adjacency list. This creates a dictionary that contains all the nodes in our graph as keys. The values of each key are a list (or set) that contains all neighboring nodes.
# Representing our graph as an adjacency list
graph = {
    'A': ['B'],
    'B': ['A', 'C', 'D'],
    'C': ['B'],
    'D': ['B', 'E', 'F'],
    'E': ['D'],
    'F': ['D'],
}
Now that we have our graph developed, let’s develop a function to implement DFS in Python. Our function will take two parameters:
- Our graph represented as an adjacency list,
- Our starting node
Let’s see what this function looks like:
# Implementing DFS in Python
def dfs(graph, start):
    visited = set()
    stack = [start]

    while stack:
        current_node = stack.pop()
        if current_node not in visited:
            visited.add(current_node)
            print(current_node)

            # Add unvisited neighbors to the stack
            for neighbor in graph[current_node]:
                if neighbor not in visited:
                    stack.append(neighbor)
While this looks like a lot of code, most of it is just comments to help guide you through what is happening. Let’s break it down step by step:
- We create a function that accepts a graph (as an adjacency list) and a starting node
- We then create a set to store our visited nodes and a list containing our starting node.
- While our stack isn’t empty (this is a simple way to check if a list is empty), we repeat the following actions: we pop the last item from our stack using the
.pop()method and label it the current node. If the node isn’t in our visited set, then we add it to our set. - We then check for each neighbor that the node has. If the neighbor hasn’t been visited, we append it to our stack.
Let’s now implement this function and see what we get back!
# Using Our DFS Function
dfs(graph, 'A')

# Returns:
# A
# B
# D
# F
# E
# C
We can see that, as expected, our function returned our expected result after traversing the entire graph.
We can actually simplify this implementation by using recursion. Let’s take a look at this in the next section.
Implementing Depth-First Search in Python Using Recursion
You can simplify implementing depth-first search in Python by using recursion. This is where a trade-off between readability for new coders and simpler code comes into play. Take a look at the function below to see how to implement DFS recursively in Python:
# Implementing DFS Using Recursion
def dfs_recursive(graph, start, visited=None):
    if visited is None:
        visited = set()
    visited.add(start)

    # Do something with the current node, e.g., print it
    print(start)

    for neighbor in graph[start]:
        if neighbor not in visited:
            dfs_recursive(graph, neighbor, visited)
In the function above, we first define a function, dfs_recursive(), which takes three parameters: our graph, our starting node, and a visited argument. The function first checks if visited is equal to None, which is the default parameter. If it is, it creates an empty set. Then, we add our current starting node to it and act on that node. We then loop over each neighbor of the starting node. If the neighbor is not visited, it calls the function recursively. This is done until the entire tree has been visited.
Python has many great libraries that make it easier to work with and traverse graphs. Let’s take a look at NetworkX, which allows us to more easily implement depth-first search.
Implementing Bread-First Search in Python Using NetworkX
We can use the Python NetworkX library to implement a depth-first search. Because the library isn’t built into Python, we first need to install this. We can do this using the pip package manager and entering the command shown below in your terminal:
pip install networkxNetworkX allows you to easily implement graphs in Python. For example, you can pass in an adjacency list like we had been using to create a graph object. Let’s take see what this looks like:
# Creating a NetworkX Graph object
import networkx as nx
graph = {
    'A': ['B'],
    'B': ['A', 'C', 'D'],
    'C': ['B'],
    'D': ['B', 'E', 'F'],
    'E': ['D'],
    'F': ['D'],
}

G = nx.Graph(graph)
print(G)

# Returns: Graph with 6 nodes and 5 edges
In the code block above, we first imported NetworkX using the alias nx. We then used the same adjacency list to represent our graph. We passed this into the Graph() constructor class. Finally, we printed our graph, returning some high-level information about the graph.
We can use a number of different depth-first search functions that NetworkX has available. To see how the library would traverse down our down, we can use the dfs_tree() function. The function traverses down the given graph, using a provided starting node:
# Implementing DFS in NetworkX
dfs = list(nx.dfs_tree(G=G, source='A'))
print(dfs)

# Returns:
# ['A', 'B', 'C', 'D', 'E', 'F']
We can see that by passing our graph, G, into the function alongside a source node 'A', we can return the list that the function follows to traverse the graph.
The library provides many different depth-first search functions. You can learn more about the different traversal options in the official documentation.
Conclusion
In this tutorial, you’ve delved into the Depth-First Search (DFS) algorithm, a foundational graph traversal method with diverse applications like finding connected components, topological sorting, and solving puzzles. DFS prioritizes depth over breadth, systematically exploring each branch deeply before backtracking.
Throughout this tutorial, you’ve gained insights into:
- The essence of the DFS algorithm, from its pseudo-code representation to its Python implementation.
- An understanding of how DFS works by exploring nodes and their neighbors systematically, using both iterative and recursive methods.
- Utilizing Python’s NetworkX library to simplify graph implementation and traversal, showcasing its utility in DFS.
By examining theory, pseudo-code breakdown, manual implementation, and library utilization, you’ve unlocked a comprehensive understanding of DFS. Armed with this knowledge, you’re poised to apply DFS effectively across various graph-related problems, leveraging both manual and library-based approaches in Python.