In this tutorial, you’ll learn how to implement Python’s breadth-first search (or BFS) algorithm. The BFS algorithm is an important and foundational graph traversal algorithm with many important applications, such as finding the shortest path in an unweighted graph, social networking, and web crawling.
By the end of this tutorial, you’ll have learned the following:
- What the breadth-first search algorithm is and how to implement it using pseudo-code
- How to implement breadth-first search in Python from scratch
- How to implement the breadth-first search algorithm in Python using the NetworkX library
Want to learn about the depth-first search algorithm instead? I have a full tutorial on the breadth-first search algorithm (BFS) in Python here.
Table of Contents
Understanding the Breadth-First Search Algorithm
The Breadth-First Search algorithm is a foundational algorithm for traversing a graph. As the name implies, it prioritizes breadth over depth.
Breadth-First Search (BFS) explores all neighbors at the present level before moving to the next, guaranteeing the shortest path in unweighted graphs, while Depth-First Search (DFS) explores as far as possible along each branch before backtracking, often using less memory but not ensuring the shortest path.
Let’s take a look at an example. Imagine we have the following graph and we want to traverse all nodes, starting at node 'A'.
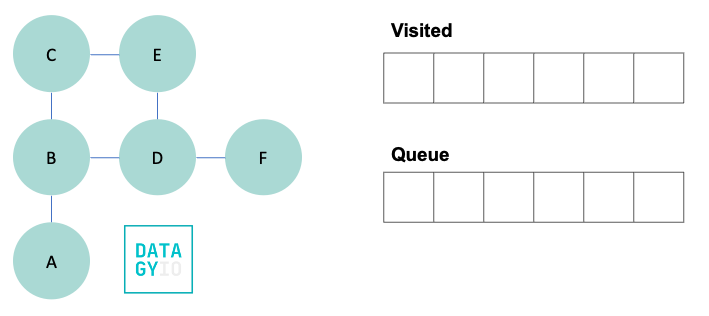
To do this, we create two objects:
- A queue, to keep track of items being added, in a first-in-first-out method, and
- A set, to keep track of nodes that we have already visited
To kick things off, let’s start by marking our starting node as visited, by adding it to our visited set. We then search for all of its neighbors and add them to our queue.
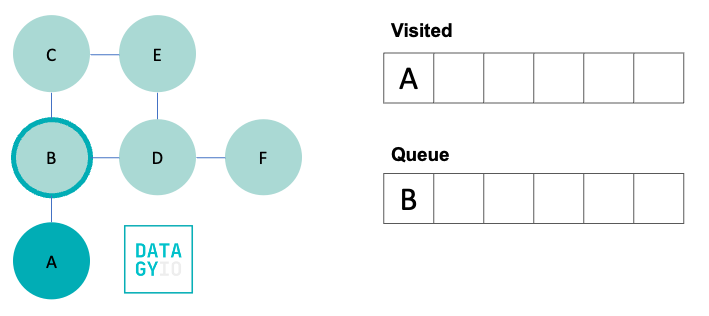
In the image above, we moved our visited node to our set of visited nodes. This allows us to ensure that we don’t accidentally visit it again. We also added the only neighbor 'B' to our queue. In the image, it’s highlighted with a darker circle, indicating that we know we will visit it shortly.
In our next step, we move to B. In doing so, we remove it from our queue and add it to our visited set. We then check for all of its neighbors, which in this case are 'C' and 'D' and add them to our queue.
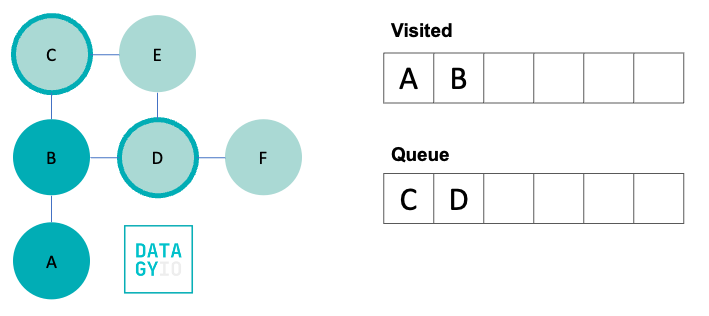
Following this, we then take the left-most item in our queue and visit it. We add it to our visited set and discover all of its neighbors. Because 'B' was already visited, we don’t add it to our queue. Instead we add only 'E'.
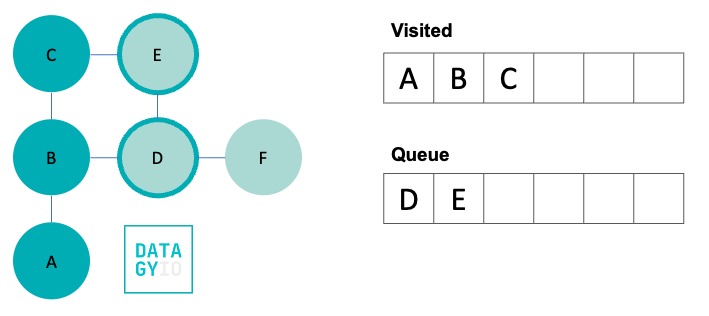
We then, again, take the left-most item from our queue and visit it. We search for all of its neighbors and add them to our queue.
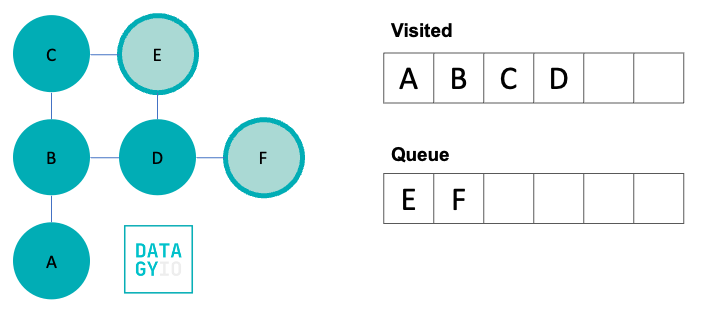
We then visit 'E', our left-most item in the queue. Because 'E' doesn’t have any neighbors we haven’t yet visited, we don’t add anything to the queue.
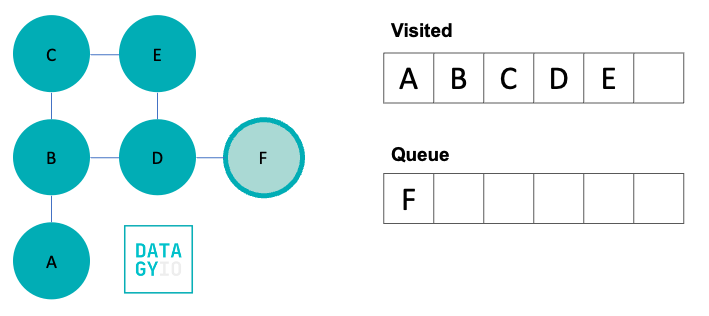
In our final step, we visit 'F'. Because 'F' doesn’t have any neighbors we haven’t yet seen, our breadth-first search comes to an end here.
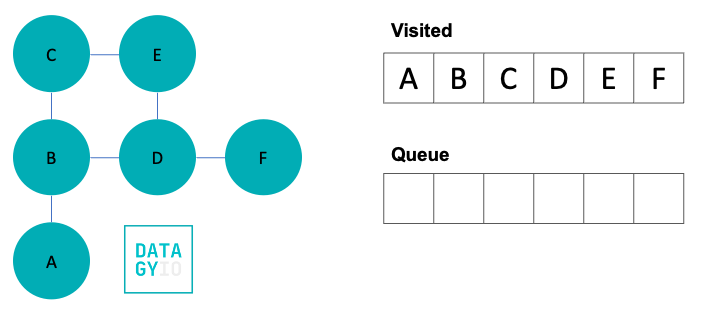
Now that you have seen how breadth-first search (BFS) works in theory, let’s develop some pseudo code to better understand how we can implement this algorithm in Python.
Pseudo-Code for Breadth-First Search
Writing some pseudo-code for the breadth-first search algorithm will give us a strong foundation to use to implement it in Python. Let’s take a look at what this pseudo-code looks like:
create a queue, q
mark node as visited and put node into q
while q is non-empty
    remove the head node of q and mark as visited
    add all (unvisited) neighbours of node to q
Let’s break down what our pseudo-code is doing:
- We create a queue to hold the nodes to visit
- We mark our starting node as visited and put it in the queue
- We then use a while loop to continue while the queue contains items
- In our loop, we first remove the head item and mark it as visited. We then add all unvisited neighbors to the queue.
Now that we know what we need to do, let’s dive into how we would implement this in Python!
Implementing Breadth-First Search in Python From Scratch
The breadth-first search algorithm can seem a little daunting to implement in Python. However, it can be implemented easily and eloquently. Let’s break it down step-by-step and see how to do this.
We’ll start by implementing our graph as an adjacency list. This creates a dictionary that contains all the nodes in our graph as keys. The values of each key are a list (or set) that contains all neighboring nodes.
# Representing our graph as an adjacency list
graph = {
    'A': ['B'],
    'B': ['A', 'C', 'D'],
    'C': ['B', 'E'],
    'D': ['B', 'E', 'F'],
    'E': ['C', 'D'],
    'F': ['D'],
}
Now that we have our graph developed, let’s develop a function to implement BFS in Python. Our function will take two parameters:
- Our graph represented as an adjacency list,
- Our starting node
Let’s see what this function looks like:
from collections import deque

def bfs(graph, start_node):
  # Initialize empty set for visited
  visited = set()

  # Initialize empty queue for traversing
  queue = deque()

  # Add the initial
  visited.add(start_node)
  queue.append(start_node)

  # While items exist in the queue
  while queue:
    # Remove the left-most item
    m = queue.popleft()

    # Check all neighbors
    for neighbour in graph[m]:

      # If the neighbor hasn't been visited
      if neighbour not in visited:
        visited.add(neighbour)
        queue.append(neighbour)

  return visited
While this looks like a lot of code, most of it is just comments to help guide you through what is happening. Let’s break it down step by step:
- Initialization:
- It initializes an empty set called
visitedto keep track of visited nodes. - A
deque(double-ended queue) namedqueueis initialized for traversal.
- It initializes an empty set called
- Starting Node:
- The starting node is added to both
visitedandqueueto initiate the traversal.
- The starting node is added to both
- BFS Traversal:
- The while loop continues until the
queueis empty. - Inside the loop, it dequeues the left-most node (
m) from the queue. - It then iterates through the neighbors of
musingfor neighbour in graph[m].
- The while loop continues until the
- Visiting Neighbors:
- For each neighbor:
- If the neighbor hasn’t been visited (checked via
if neighbour not in visited):- It adds the neighbor to the
visitedset. - Enqueues the neighbor into the
queuefor further exploration.
- It adds the neighbor to the
- If the neighbor hasn’t been visited (checked via
- For each neighbor:
- Return Visited Nodes:
- Once the traversal completes, the function returns the
visitedset containing all visited nodes reachable from thestart_node.
- Once the traversal completes, the function returns the
Let’s now implement this function and see what we get back!
# Using our breadth-first function
print(bfs(graph, 'A'))

# Returns:
# {'A', 'B', 'C', 'D', 'E', 'F'}
We can see that, as expected, our function returned our expected result after traversing the entire graph.
Python has many great libraries that make it easier to work with and traverse graphs. Let’s take a look at NetworkX, which allows us to more easily implement breadth-first search.
Implementing Breadth-First Search in Python Using NetworkX
We can use the Python NetworkX library to implement a breadth-first search. Because the library isn’t built into Python, we first need to install this. We can do this using the pip package manager and entering the command shown below in your terminal:
pip install networkxNetworkX allows you to easily implement graphs in Python. For example, you can pass in an adjacency list like we had been using to create a graph object. Let’s take see what this looks like:
# Creating a NetworkX Graph object
import networkx as nx
graph = {
    'A': ['B'],
    'B': ['A', 'C', 'D'],
    'C': ['B', 'E'],
    'D': ['B', 'E', 'F'],
    'E': ['C', 'D'],
    'F': ['D'],
}

G = nx.Graph(graph)
print(G)

# Returns: Graph with 6 nodes and 6 edges
In the code block above, we first imported NetworkX using the alias nx. We then used the same adjacency list to represent our graph. We passed this into the Graph() constructor class. Finally, we printed our graph, returning some high-level information about the graph.
We can use a number of different breadth-first search functions that NetworkX has available. To see how the library would traverse down our down, we can use the bfs_tree() function. The function traverses down the given graph, using a provided starting node:
# Implementing BFS in NetworkX
bfs = list(nx.bfs_tree(G=G, source='A'))
print(bfs)

# Returns:
['A', 'B', 'C', 'D', 'E', 'F']
We can see that by passing our graph, G, into the function alongside a source node 'A', we can return the list that the function follows to traverse the graph.
The library provides many different breadth-first search functions. You can learn more about the different traversal options in the official documentation.
Conclusion
In this tutorial, we delved into the foundational concept of Breadth-First Search (BFS) in graph traversal using Python. BFS prioritizes exploring all neighbors at the current level before moving deeper, making it valuable for various applications such as finding shortest paths and exploring networks.
We explored BFS step-by-step, understanding its mechanics through an illustrative example and developing a clear pseudo-code representation. Moving on, we implemented BFS both from scratch and using the NetworkX library. The Python code demonstrated the elegant simplicity of BFS implementation, offering a powerful tool for traversing graphs efficiently. Additionally, NetworkX showcased its utility in simplifying graph handling and BFS execution, providing a seamless alternative for traversal operations. Whether opting for a hands-on approach or leveraging libraries like NetworkX, mastering BFS equips Python developers with a fundamental algorithmic tool for graph exploration and problem-solving.

